Blood Lab’s analyzer is best understood as a visual blood-physics reference rather than a screen of fixed damage numbers. This page covers Blood Lab itself, not a Resident Evil Requiem blood lab analysis. Select a Test Subject, choose a weapon, and compare the wound location, spray or flow, surface contact, and the subject’s condition. The most useful baseline is to test the same tool on the head, torso, legs, and throat, then repeat the comparison with armor and a controlled room position.
What the Blood Lab analyzer shows
The analyzer is the experiment itself: a wound creates visible blood behavior that you can follow from the subject to the room. Blood can spray outward after a hit, continue flowing from an open wound, drip onto nearby surfaces, slide down a wall, and collect on the floor. Those observations help you compare a weapon or hit location without treating every unconscious or dead subject state as proof of blood loss alone.
The practical record for each test is simple: weapon, body region, armor state, room position, visible blood behavior, and final subject state. Keeping those observations together matters because bullets add impact, knives can make repeated punctures, armor changes torso results, and environmental surfaces change where the blood can be seen.
Blood behavior by test result
Use this reference table to decide what to look for during an experiment. These are observable categories, not fixed damage values or guaranteed time-to-death measurements.
| Analyzer result | What to watch | Useful comparison |
|---|---|---|
| Blood spray | Blood moves outward in multiple directions after a shot, stab, or other impact. | Repeat the same hit from different angles or with a different weapon. |
| Blood flow | Blood continues leaving the wound and can travel over the subject, wall, or floor. | Leave a heavily bleeding wound active and follow its path before cleaning. |
| Blood pooling | Blood gathers on the floor or another surface as the subject continues bleeding. | Place the subject near the floor and compare the visible pool after movement. |
| Surface spreading | Walls and floors affect where drips and streaks remain visible. | Use the same wound beside a wall and in an open area. |
| Bullet impact | A projectile can add impact movement and spread blood beyond the wound itself. | Compare a shot to a knife wound on the same body region. |
| Knife wound | Repeated knife attacks can leave multiple wounds and increase visible bleeding. | Test one stab, then several stabs in the same area. |
| Blood-loss state | A subject may remain active, become KO or unconscious, or die as blood is lost. | Record the wound and other impacts before assigning the cause. |
The table is most useful as a checklist. A spray is an immediate visual response, while a flow, drip, or pool is evidence that blood continues to move after the hit. A subject’s later collapse is a separate observation. Recorded demonstrations connect some deaths to losing too much blood, but shock, explosion fragments, broken limbs, and other impacts can also affect the result.
Which body regions are easiest to compare
Body location is the strongest starting point for a blood-analysis test. The torso usually gives a more obvious blood response than the head, and the throat can produce a particularly rapid drain. A head hit may still cause impact or other injury, but the visible bleeding can be less pronounced than a torso or throat wound. Legs are useful as a lower-body comparison, especially when you want to separate a localized wound from a heavily bleeding central-body test.
Run the comparison in this order:
- Start with an unarmored subject and one ordinary weapon.
- Test the head, torso, leg, and throat separately rather than mixing locations in one record.
- Watch for the first spray, then whether the wound keeps flowing or leaves a trail.
- Note whether the subject stays conscious, becomes KO or unconscious, or dies.
- Repeat the torso test with a jacket or other protective equipment before comparing conclusions.
The throat test is especially useful when you need to observe a fast blood-loss result and the path of blood toward a wall. It should not be treated as a confirmed universal timing test: the evidence does not provide a fixed loss rate, and other damage can overlap with the subject’s collapse. The head-versus-torso difference is likewise a visual comparison, not a promise that every weapon behaves identically in every situation.
Observe throat bleeding and wall flow in Blood Lab
This moment supports the throat-wound test by showing rapid blood loss and blood reaching and sliding along a wall.

How weapons change the reading
Weapons provide different ways to create the conditions that the analyzer displays. A pistol, shotgun, rifle, grenade, knife, and other experimental tools can produce different combinations of wound, impact, fragments, limb damage, and blood movement. The cleanest comparison changes one variable at a time: keep the subject, armor, room, and body region stable while changing the weapon.
For firearms, look beyond the initial redirection of blood. A bullet can make the blood jiggle or spread because of its impact, and a shot can produce a continuing drain when the wound remains open. A knife is useful for testing repeated local wounds; several attacks in one area can add visible bleeding and may also damage a limb. Grenades and fragment effects are harder to read as pure blood tests because the blast and fragments introduce additional causes of injury.
Do not use the final state alone to rank weapons. If a subject dies after an explosive hit, the display does not establish that blood loss was the only cause. If a subject becomes unconscious after a firearm or knife test, record the impact and wound together. This is also why the analyzer is more useful for comparing visible behavior than for claiming an exact damage formula.
Armor and room position
Armor changes the baseline. A jacket or protective equipment can block some torso shots, so an armored torso result cannot be placed directly beside an unarmored torso result as though the tests were identical. Test the same body region with and without the jacket, and record whether the hit produces visible bleeding, impact, or a different outcome. Protection does not make every body region equivalent; a head or throat test remains a different experiment.
Room geometry changes the second half of the observation. Put a subject beside a wall when you want to see blood slide or leave a track, and use the floor when you want to watch dripping and pooling. Chairs, barriers, glass, and other laboratory structures can help position a subject, but they also make movement and impact harder to isolate. Keep the setup stable when comparing results.
Cleaning is part of the experiment boundary. Use the mop when you want to remove selected blood or debris while preserving the rest of the room, or use Clear All when the experiment is over and you want a clean setup. Cleaning before checking a trail or pool removes the visual record you were trying to compare.
Reading subject states and recovery
Track the subject’s state separately from the blood pattern. A subject can remain conscious, become KO or unconscious, recover, or die. Some demonstrations explicitly connect a death with losing too much blood, but shock, a grenade, fragments, broken limbs, and other injuries can overlap. The safest analysis is to write down the weapon and body region before interpreting the final state.
Medicine gives you a way to test the boundary between injury and recovery. Bandages, chest seals, medicine, and defibrillators are available treatment tools, and the game supports experiments that try to stop bleeding, stabilize a subject, or restore consciousness. The exact effect of every medical item and its numerical effect on blood loss are not established here, so use the current in-game result rather than assuming that one treatment reverses every wound.
For a recovery comparison, make the wound first, observe the untreated state, apply one medical item, and then record whether bleeding, consciousness, or movement changes. Do not combine several treatments if your goal is to identify one item’s effect. If the subject has also been hit by an explosion or suffered a major impact, label the result as mixed rather than attributing recovery or death to the wound alone.
Blood colour and unlock progress
Blood Lab supports choosing a blood colour, but a complete list of colour choices is not established here. Treat colour as a presentation setting, not as proof that one colour changes blood loss or wound behavior unless the current game panel says otherwise.
Blood volume also connects the laboratory to progression. The game description says that every litre spilled contributes toward unlocking weapons and NPC models. It does not establish a complete threshold table, exact reward order, or a confirmed way to measure the displayed volume for each individual experiment. Use the current progression or unlock panel for mutable values, and do not infer a precise unlock requirement from the size of a visible pool.
This distinction keeps the analyzer useful: visual blood behavior can be compared immediately, while colour options, progression thresholds, and rewards should be checked against the current in-game interface.
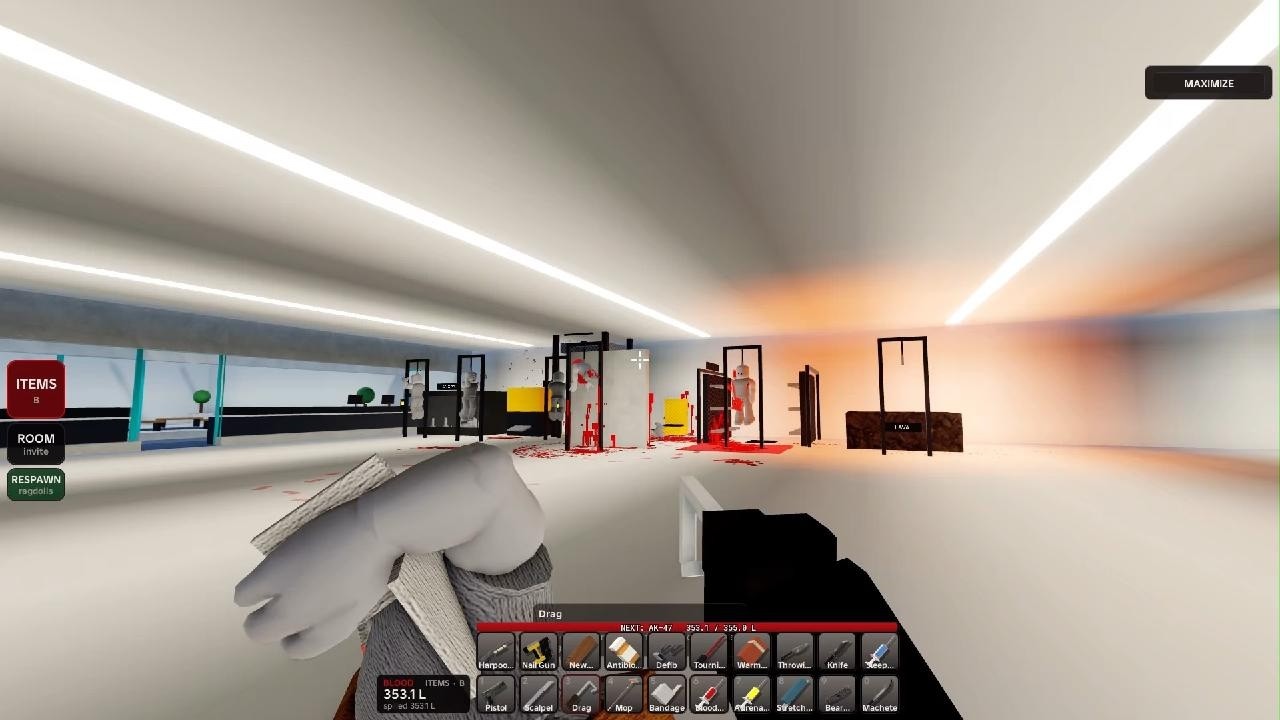
Connect spilled blood with weapon unlock progress
This moment supports the progression section by connecting having less blood with making more progress toward weapon unlocks.
Limits of a blood-analysis test
The analyzer can show how wounds and surfaces interact, but it is not a confirmed diagnostic calculator. There are no supported fixed values here for exact blood-loss speed, wound damage, time to unconsciousness, time to death, colour lists, medical-item amounts, or unlock thresholds. A large spray does not automatically mean the same continuing drain as a throat wound, and a collapse does not identify one cause when several impacts happened together.
For a reliable comparison, reset the room, use one subject, change one variable, and record the visual response before cleaning. Compare like with like: the same region, armor state, weapon class, and room position. When the current game panel exposes a mutable value, prefer that value over a remembered guide claim.
First-time Blood Lab analysis questions
Which body region should I test first for visible bleeding?
Start with the torso, then compare it with the throat, head, and leg. The torso and throat generally show more obvious bleeding than the head, while the throat is useful for observing a rapid drain and blood reaching nearby surfaces.
Does a KO prove that the subject lost too much blood?
No. Blood loss can contribute to a KO or death, but impact, shock, explosions, and fragments can overlap with the result. Record the weapon, hit location, and other injuries before assigning a cause.
How can I compare armored and unarmored results?
Use the same subject setup, body region, weapon, and room position, then repeat the test with a jacket or other protection equipped. Armor can block some torso shots, so keep the two outcomes as separate baselines.
What should I do before testing a blood trail or pool?
Position the subject near the wall or floor you want to inspect and leave the wound active long enough to observe its path. Do not mop or use Clear All until you have recorded the spray, flow, drips, and pooling.